What is a bleed?
If you want any image, colors, and/or design to reach the edge of the printed page (no white margin), the computer file you provide must be specifically designed to have a bleed. A bleed is basically colors or image stretched or "bleeding" outside of the cut line, so that the colors could be printed to the edge of the paper without showing white margins. If your final print piece has a white border, it does not need a bleed.
The bleed area is simply excess image that is printed and then later trimmed off so that it won't end up on your final print product. After the bleed or excess image is cut off, your final print product will be the size you ordered.
This concept is very similar to rolling out cookie dough and using cookie cutters — the excess dough is trimmed away and will not be a part of your final cookie.
Why do I need a bleed? What happens if I don't add a bleed?
Printing presses and digital copiers can't print right to the edge of a sheet of paper because they have a gripper to hold the paper to run it through. To make sure that the colors or image reach the edge of the paper, we have to print the file — including the bleed — on a larger-sized paper, and then cut it down to the finished size (or "cut size"), which is the size you ordered.
When printing and cutting many sheets at one time by machine, limited technology causes the print to slightly shift. If the print does not have a bleed, a white strip (instead of the colors or graphics that you want) may show on the edge of the paper. If the print has a white border, the bleed is not needed because the border is white anyway.
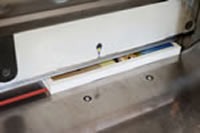
Cutting with bleed — color goes to the edge
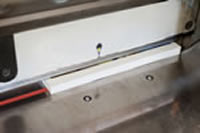
Cutting without bleed — white strip appears
Result when no bleed is added:
How do I make a bleed? How big should a bleed be?
To create a bleed, you must stretch or extend your design beyond the cut line (size of the printed product), including any background colors, photos, or other items that you want on the edge of your paper.
Your design (colors or graphics touching the edge) must be extended by 0.125" on all 4 sides. After it is printed, it will be cut down to the final size you ordered. Because the bleed is 0.125" on all 4 sides, your page size will be 0.25" larger than the final cut size on both the width and the height.
Example: If you order a 4"×6" postcard, the PDF file you submit for print should be 4.25"×6.25". It will be printed at 4.25"×6.25" and then the bleed — or excess image — will be cut off so that the final size delivered to you is 4"×6" with the colors going to the edge of the paper.
The software you use to create your project will determine how you set up bleeds. Follow the guide for your program:
Set document to final cut size, extend edge elements past the page boundary, then export PDF with crop marks and bleed enabled.
Set document bleed in Document Setup, extend edge elements, then export PDF with Marks and Bleeds checked.
Set canvas size to final size plus 0.125" on each side. For a 4"×6" card, create at 4.25"×6.25".
Set page size to final size plus 0.25" on width and height, then export as high-res PDF.
Adjust slide dimensions to include bleed, extend background elements to the edges, export as PDF.
Set page size to bleed size and extend backgrounds to the edges before exporting as PDF.
Set document to final cut size, extend edge elements past the boundary, then export PDF with bleed and crop marks.
What is a cut line?
The cut line is the final flat size of the printed product. To print all the way to the edge (known as "bleed" because the colors bleed off the paper) we start from a bigger piece of paper and cut down to create the final size, known as the "cut size."
What is a safety zone?
In addition to the bleed area beyond the edge of a page, it is good to allow a "safety zone" inside the page boundary. Any important elements, such as text or graphics not bleeding off the page, should be kept within this "safety zone" — a buffer of 0.25" in from the cut size on all four sides. This will make your printed piece look nicer and help prevent text or images too close to the cut line from being cut off when cutting many sheets at one time by machine.
Common Mistakes When Designing Files with Full Bleed and Safety Zone
File with No Bleed
The number one mistake on files we receive is sending a file without bleeds. If you want your print to have the colors and graphics going to the edge without any white margins, you must specifically design your file to have a bleed, with colors and graphics "bleeding" or extending past the cut line.
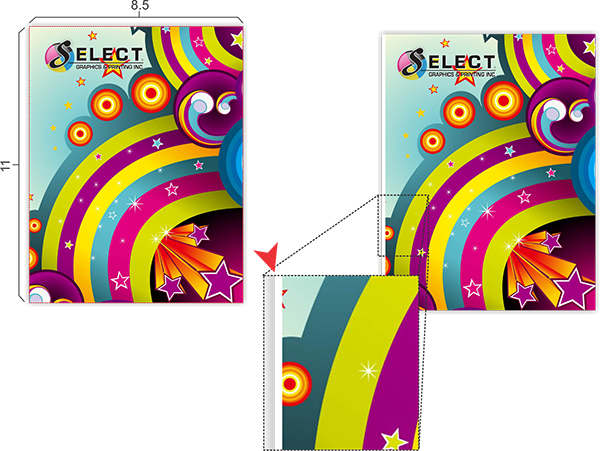
Example: Sending an 8.5"×11" digital file to be printed as 8.5"×11" with no margins is not correct. The file should actually be 8.75"×11.25" with a bleed and cut down to 8.5"×11".
Adding a white border as the "bleed"
One of the biggest mistakes when designing a file with bleed is adding a 0.125" white border on each side of the design to give the file "bleeds." This is not correct because the bleeds actually have to be part of the design. The purpose of a bleed is so that when the print is cut, the same design will still be on the edge of the printed page. When printing and cutting many sheets at one time, papers slightly shift, and a white "bleed" defeats the purpose entirely — the result is exactly the same as submitting a file without a bleed.
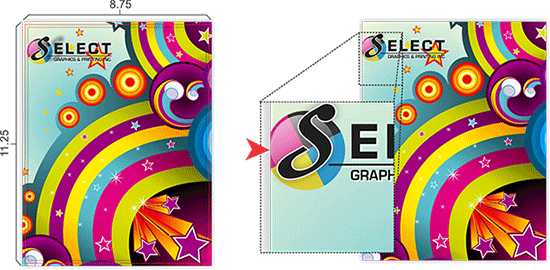
Expanding the image size but placing text or graphics outside the safety zone
A very common mistake is to increase the entire image size — for example from 8.5"×11" to 8.75"×11.25". Although this makes the bleed size correct, it also ends up stretching important text and graphics from the center of the page to outside the safety zone. When adding a bleed, try to adjust only the background graphics or any graphics touching the edge rather than extending the entire image. If you do extend the entire image, the important text and graphics must be far enough inward that moving them 0.125" outward does not place them outside the safety zone.
Placing important text or graphics outside the safety zone
Designers sometimes forget that the bleed will not be on the final product even though it appears on their file, and they place important text or graphics too close to the cut line. The bleed will be cut off, so your final product will be smaller than your design file. The safety zone — 0.125" inside the cut line or 0.25" inside the bleed line on all 4 sides — is safe. Anything outside of that is in danger of being cut off during trimming.
Common Print Size and File Size Dimensions
| Final Cut Size | File Size with Bleed |
|---|
| 3.5" × 2" | 3.75" × 2.25" |
| 4" × 6" | 4.25" × 6.25" |
| 5" × 7" | 5.25" × 7.25" |
| 5.5" × 8.5" | 5.75" × 8.75" |
| 8.5" × 11" | 8.75" × 11.25" |